The HVAC system uses three electric actuators to adjust temperature and air distribution.
The actuators are:
* The temperature air mix actuator.
* The mode actuator.
* The air inlet actuator.
The actuators are specifically designed for the right and left side of the heater and the A/C module. When servicing the actuator, ensure that you replace the actuator with the correct service part for the position being serviced.
The reversible DC motor in the actuator operates the valve within the HVAC module.
The actuators are controlled through the inputs from the heater and A/C control.
Air Inlet Actuator

Locations
Under the right side of the instrument panel, right of the blower motor
Under the dash panel, On the HVAC housing near the Blower motor control module
-----------
Driver Air Mix Actuator
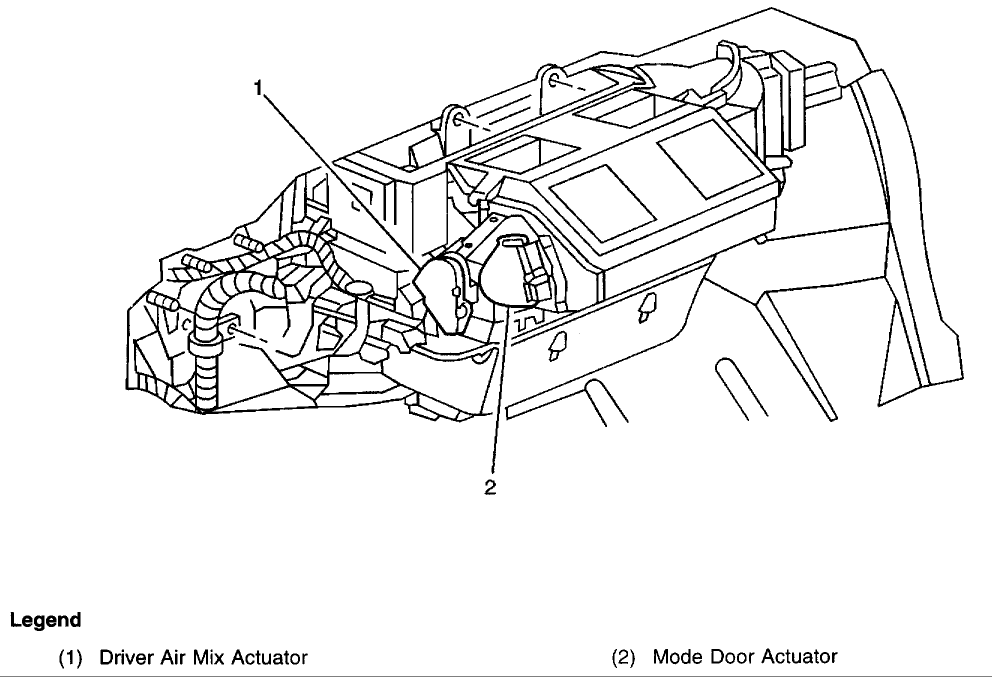
Locations
Under the center left side of the instrument panel, on the left side of the HVAC module
Under the dash panel, On the left side HVAC housing near the top.

Locations
Under the center left side of the instrument panel, on the left side of the HVAC module
Under the dash panel, On the left side HVAC housing near the top.
---------------
Air Inlet Actuator Replacement
REMOVAL PROCEDURE
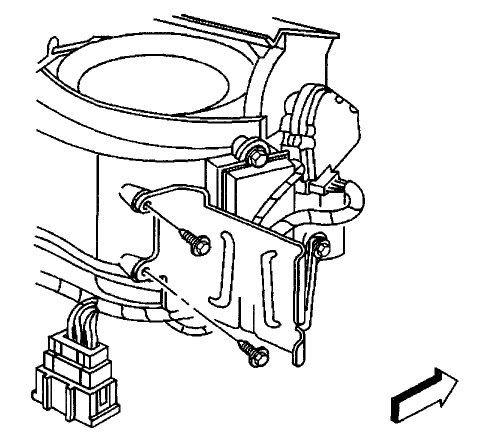
1. Remove the IP compartment.
2. Remove the right sound insulator.
3. Remove the Dash Integration Module (DIM) from the bracket.
4. Remove the rear two DIM module bracket screws.
5. Reposition the DIM module bracket to gain access to the air inlet actuator.
6. Remove the electrical connector from the air inlet actuator.
7. Remove the air inlet actuator retaining screws.
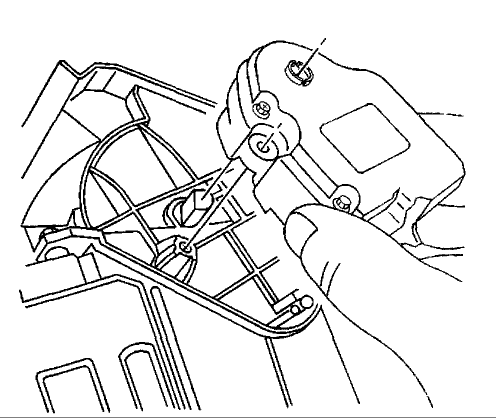
8. Remove the air inlet actuator.
INSTALLATION PROCEDURE

1. Install the air inlet actuator. NOTE: Refer to Fastener Notice in Service Precautions.
2. Install the air inlet actuator retaining screws (1). Tighten Tighten the fasteners to 1.4 N.m (12 lb in) .
3. Install the electrical connector to the air inlet actuator.

4. Position the DIM module bracket to its original position.
5. Install the rear two DIM module bracket retaining screws. Tighten Tighten the fasteners to 1.4 N.m (12 lb in) .
6. Install the DIM module into the bracket.
7. Install the right sound insulator.
8. Install the IP compartment.
REMOVAL PROCEDURE

1. Remove the IP compartment.
2. Remove the right sound insulator.
3. Remove the Dash Integration Module (DIM) from the bracket.
4. Remove the rear two DIM module bracket screws.
5. Reposition the DIM module bracket to gain access to the air inlet actuator.
6. Remove the electrical connector from the air inlet actuator.
7. Remove the air inlet actuator retaining screws.

8. Remove the air inlet actuator.
INSTALLATION PROCEDURE

1. Install the air inlet actuator. NOTE: Refer to Fastener Notice in Service Precautions.
2. Install the air inlet actuator retaining screws (1). Tighten Tighten the fasteners to 1.4 N.m (12 lb in) .
3. Install the electrical connector to the air inlet actuator.

4. Position the DIM module bracket to its original position.
5. Install the rear two DIM module bracket retaining screws. Tighten Tighten the fasteners to 1.4 N.m (12 lb in) .
6. Install the DIM module into the bracket.
7. Install the right sound insulator.
8. Install the IP compartment.
------------
Mode Actuator Replacement
REMOVAL PROCEDURE
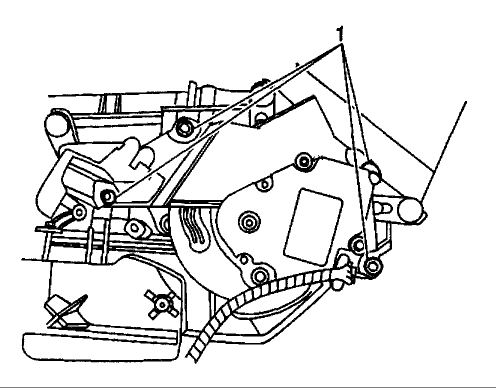
1. Remove the left sound insulator.
3. Remove the electrical connector from the mode actuator.
4. Remove the mode actuator retaining screws (1).
5. Remove the mode actuator.
INSTALLATION PROCEDURE

1. Align the mode valve levers with the cam slots.
2. Install the mode actuator. NOTE: Refer to Fastener Notice in Service Precautions.
3. Install the mode actuator retaining screws (1). Tighten Tighten the fasteners to 1.4 N.m (12 lb in) .
4. Connect the electrical connector to the mode actuator.
5. Install the knee bolster.
6. Install the left side sound insulator.
REMOVAL PROCEDURE

1. Remove the left sound insulator.
3. Remove the electrical connector from the mode actuator.
4. Remove the mode actuator retaining screws (1).
5. Remove the mode actuator.
INSTALLATION PROCEDURE

1. Align the mode valve levers with the cam slots.
2. Install the mode actuator. NOTE: Refer to Fastener Notice in Service Precautions.
3. Install the mode actuator retaining screws (1). Tighten Tighten the fasteners to 1.4 N.m (12 lb in) .
4. Connect the electrical connector to the mode actuator.
5. Install the knee bolster.
6. Install the left side sound insulator.
-------------
Temperature Actuator Replacement
REMOVAL PROCEDURE
1. Remove the IP compartment.
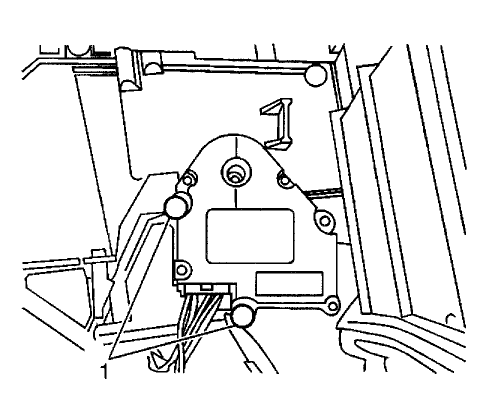
2. Remove the electrical connector from the temperature air mix actuator.
3. Remove the temperature air mix actuator retaining screws (1).
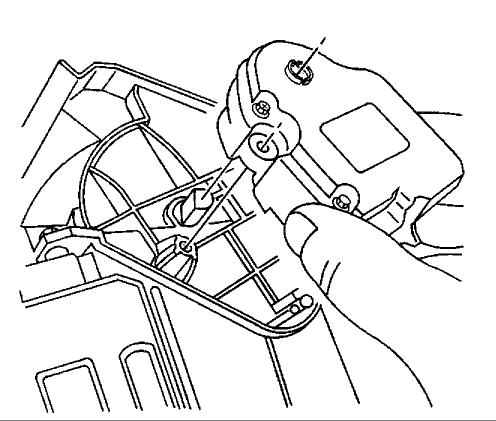
4. Remove the temperature air mix actuator.
INSTALLATION PROCEDURE

1. Install the temperature air mix actuator. NOTE: Refer to Fastener Notice in Service Precautions.

2. Install the temperature air mix retaining screws (1). Tighten Tighten the fasteners to 1.4 N.m (12 lb in) .
3. Install the electrical connector to the temperature air mix actuator.
4. Install the IP compartment.
REMOVAL PROCEDURE

1. Remove the IP compartment.
2. Remove the electrical connector from the temperature air mix actuator.
3. Remove the temperature air mix actuator retaining screws (1).

4. Remove the temperature air mix actuator.
INSTALLATION PROCEDURE

1. Install the temperature air mix actuator. NOTE: Refer to Fastener Notice in Service Precautions.

2. Install the temperature air mix retaining screws (1). Tighten Tighten the fasteners to 1.4 N.m (12 lb in) .
3. Install the electrical connector to the temperature air mix actuator.
4. Install the IP compartment.

No comments:
Post a Comment